I will be sharing my experience in this online field as a part-time
Technology, gaming, & many more updates here daily
How you can Control your Android Device with Python
Get link
Facebook
X
Pinterest
Email
Other Apps
Introduction
A while back I was thinking of ways in which I could annoy my friends by spamming them with messages for a few minutes, and while doing some research I came across the Android Debug Bridge. In this quick guide I will show you how you can interface with it using Python and how to create 2 quick scripts.
The ADB (Android Debug Bridge) is a command line tool (CLI) which can be used to control and communicate with an Android device. You can do many things such as install apps, debug apps, find hidden features and use a shell to interface with the device directly. To enable the ADB, your device must firstly have Developer Options unlocked and USB debugging enabled. To unlock developer options, you can go to your devices settings and scroll down to the about section and find the build number of the current software which is on the device. Click the build number 7 times and Developer Options will be enabled. Then you can go to the Developer Options panel in the settings and enable USB debugging from there. Now the only other thing you need is a USB cable to connect your device to your computer.
Here is what todays journey will look like
1. Installing the requirements
2. Getting started
3. The basics of writing scripts
4. Creating a selfie timer
5. Creating a definition searcher
Installing the requirements
The first of the 2 things we need to install, is the ADB tool on our computer. This comes automatically bundled with Android Studio, so if you already have that then do not worry. Otherwise, you can head over to the official docs and at the top of the page there should be instructions on how to install it.
Once you have installed the ADB tool, you need to get the python library which we will use to interface with the ADB and our device. You can install the pure-python-adb library using pip install pure-python-adb.
Optional
To make things easier for us while developing our scripts, we can install an open-source program called scrcpy which allows us to display and control our android device with our computer using a mouse and keyboard. To install it, you can head over to the Github repo and download the correct version for your operating system (Windows, macOS or Linux). If you are on Windows, then extract the zip file into a directory and add this directory to your path. This is so we can access the program from anywhere on our system just by typing in scrcpy into our terminal window.
Getting started
Now that all the dependencies are installed, we can start up our ADB and connect our device. Firstly, connect your device to your PC with the USB cable, if USB debugging is enabled then a message should pop up asking if it is okay for your PC to control the device, simply answer yes. Then on your PC, open up a terminal window and start the ADB server by typing in adb start-server. This should print out the following messages:
* daemon not running; starting now at tcp:5037
* daemon started successfully
If you also installed scrcpy, then you can start that by just typing scrcpy into the terminal. However, this will only work if you added it to your path, otherwise you can open the executable by changing your terminal directory to the directory of where you installed scrcpy and typing scrcpy.exe. Hopefully if everything works out, you should be able to see your device on your PC and be able to control it using your mouse and keyboard.
Now we can create a new python file and check if we can find our connected device using the library:
Here we import the AdbClient class and create a client object using it. Then we can get a list of devices connected. Lastly, we get the first device out of our list (it is generally the only one there if there is only one device connected).
The basics of writing scripts
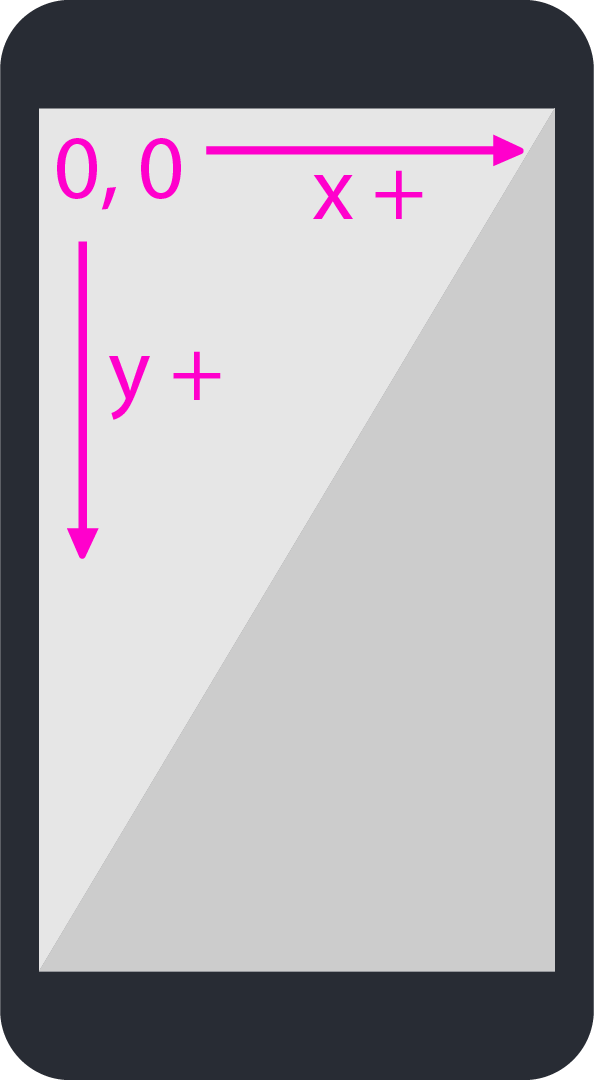
The main way we are going to interface with our device is using the shell, through this we can send commands to simulate a touch at a specific location or to swipe from A to B. To simulate screen touches (taps) we first need to work out how the screen coordinates work. To help with these we can activate the pointer location setting in the developer options. Once activated, wherever you touch on the screen, you can see that the coordinates for that point appear at the top. The coordinate system works like this:
The top left corner of the display has the x and y coordinates (0, 0) respectively, and the bottom right corners’ coordinates are the largest possible values of x and y.
Now that we know how the coordinate system works, we need to check out the different commands we can run. I have made a list of commands and how to use them below for quick reference:
Input tap x y
Input text “hello world!”
Input keyevent eventID
Here is a list of some common eventID’s:
3: home button
4: back button
5: call
6: end call
24: volume up
25: volume down
26: turn device on or off
27: open camera
64: open browser
66: enter
67: backspace
207: contacts
220: brightness down
221: brightness up
277: cut
278: copy
279: paste
If you wanted to find more, here is a long list of them here.
Creating a selfie timer
Now we know what we can do, let’s start doing it. In this first example I will show you how to create a quick selfie timer. To get started we need to import our libraries and create a connect function to connect to our device:
You can see that the connect function is identical to the previous example of how to connect to your device, except here we return the device and client objects for later use.
In our main code, we can call the connect function to retrieve the device and client objects. From there we can open up the camera app, wait 5 seconds and take a photo. It’s really that simple! As I said before, this is simply replicating what you would usually do, so thinking about how to do things is best if you do them yourself manually first and write down the steps.
Creating a definition searcher
We can do something a bit more complex now, and that is to ask the browser to find the definition of a particular word and take a screenshot to save it on our computer.
The basic flow of this program will be as such:
1. Open the browser
2. Click the search bar
3. Enter the search query
4. Wait a few seconds
5. Take a screenshot and save it
But, before we get started, you need to find the coordinates of your search bar in your default browser, you can use the method I suggested earlier to find them easily. For me they were (440, 200).
To start, we will have to import the same libraries as before, and we will also have our same connect method.
In our main function we can call the connect function, as well as assign a variable to the x and y coordinates of our search bar. Notice how this is a string and not a list or tuple, this is so we can easily incorporate the coordinates into our shell command. We can also take an input from the user to see what word they want to get the definition for:
We will add that query to a full sentence which will then be searched, this is so that we can always get the definition. After that we can open the browser and input our search query into the search bar as such:
Here we use the eventID 66 to simulate the press of the enter key to execute our search. If you wanted to, you could change the wait timings per your needs.
Lastly, we will take a screenshot using the screencap method on our device object, and we can save that as a .png file:
Here we must open the file in the write bytes mode because the screencap method returns bytes representing the image.
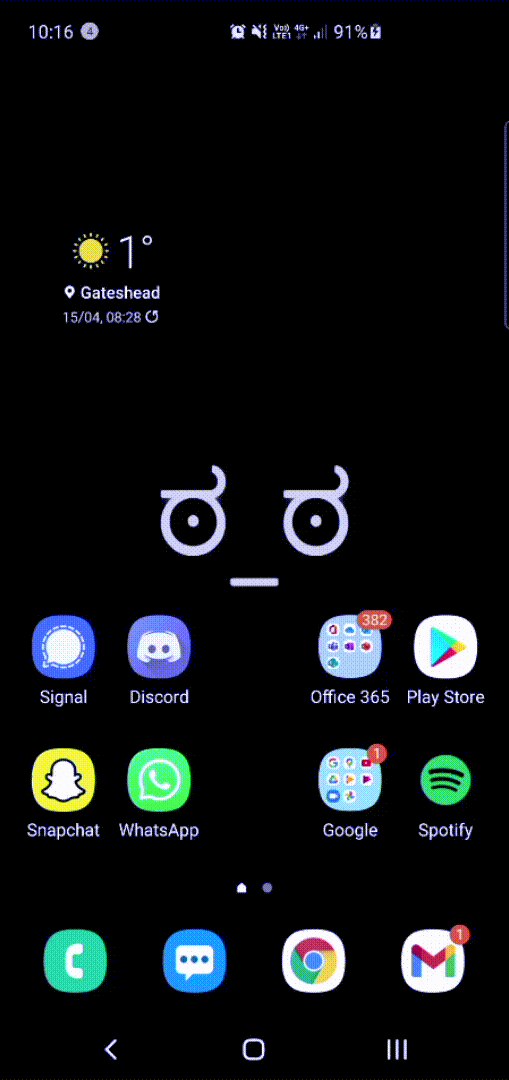
If all went according to plan, you should have a quick script which searches for a specific word. Here it is working on my phone:
Final thoughts
Hopefully you have learned something new today, personally I never even knew this was a thing before I did some research into it. The cool thing is, that you can do anything you normal would be able to do, and more since it just simulates your own touches and actions!
I hope you enjoyed the article and thank you for reading! 💖

Comments
Post a Comment